I Turned My Tiny Balcony Into a “Second Living Room” Oasis
I used to think my balcony was just… there. A slab of concrete where a dead basil plant went to be judged by the neighborhood pigeons. Then one brutally hot afternoon, I realized I was basically wasting a whole extra room. So I made a deal with myself: what if I treated this little outdoor strip like prime real estate instead of an afterthought?
Fast forward a few months, and my once-sad balcony is now where I drink my morning coffee, work, read, and occasionally ugly-cry over podcasts. Friends come over and instantly ask, “Wait, how is this the same space?” Here’s exactly what I did, what flopped, what worked insanely well, and how you can pull off the same “second living room” vibe—even if your outdoor space is tiny, weirdly shaped, or north-facing and moody.
Step One: Decide What Your Balcony Actually Needs To Do
When I first started, I made the classic mistake: I opened Pinterest, got hypnotized by fairy lights and boho cushions, and almost bought a hammock I cannot legally hang from my building.
So I hit pause and asked myself three questions:
- When do I actually want to use this space—morning, afternoon, night?
- Do I want this to be social (friends, drinks) or solo (reading, scrolling, naps)?
- How much maintenance am I realistically willing to do?
For me, the honest answer was: morning coffee, late-night chill time, mostly solo, low maintenance because I’m “water the plants tomorrow” lazy.
That changed everything. Instead of cramming in a bistro table and two chairs “just because,” I realized I wanted:
- One insanely comfortable lounging spot
- A surface for drinks / laptop / snacks
- At least a little greenery that wouldn’t die the second I blinked
When I tested this “function first, vibes second” approach, decorating got way easier. I stopped buying random cute things and started curating pieces that gave me living room energy: comfy seat, soft light, one statement plant, one side table. That’s it.
If you skip this step, you’ll end up with a pretty balcony you never actually use. I did that years ago—and it turned into a dusty showroom for abandoned spider plants.
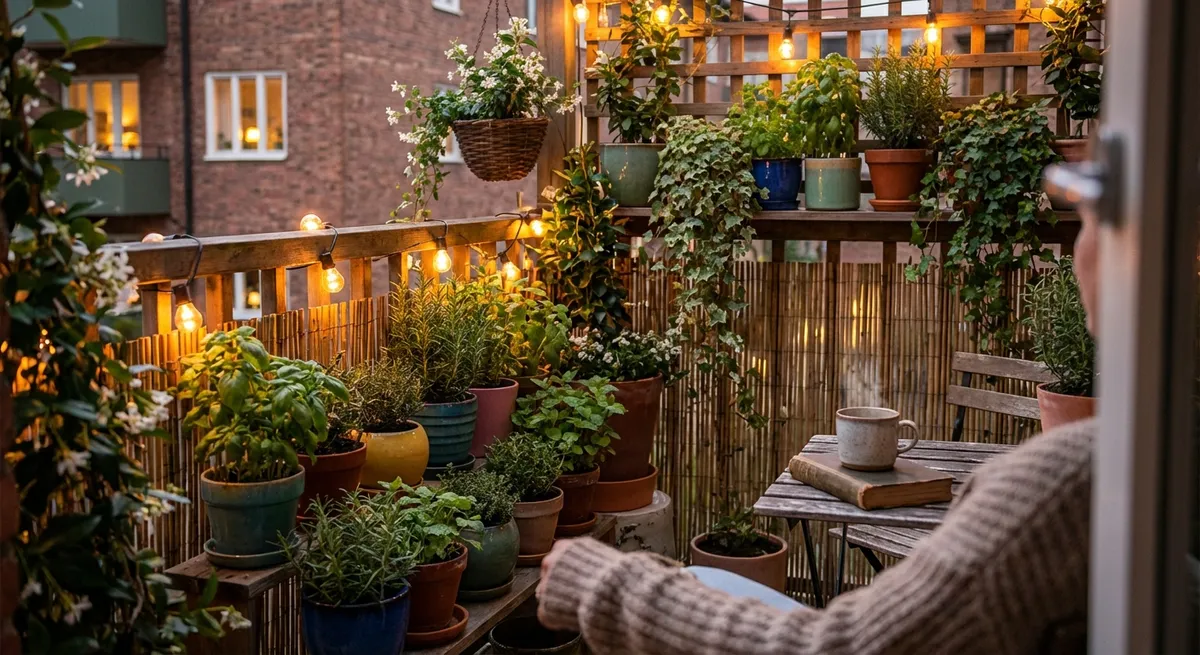
Flooring: The Fix That Instantly Erased “Ugly Rental Balcony” Energy
The biggest transformation came from something I didn’t expect: the floor.
My original balcony floor was rough, stained concrete with suspicious mystery splatters. No amount of fairy lights could distract from the prison-yard vibes. So I tested three flooring options over a few weeks:
1. Outdoor Rug (The Fast Fix)
I started with a cheap outdoor rug. It was instant warmth—visually and literally. It made stepping outside barefoot actually pleasant. But after the first rainstorm, I discovered the downside: it took forever to dry, and I had to prop it up on chairs like balcony laundry.
Pros:
- Fast, cheap, huge design impact
- Easy to switch styles with the seasons
Cons:
- Gets gross if it stays wet
- Can trap dirt, pollen, and dust underneath
2. Interlocking Deck Tiles (The Upgrade That Felt Illegal)
Next, I grabbed interlocking wood-look deck tiles that click together (I used IKEA-style ones, but lots of brands make them). Laying them down was… weirdly satisfying. Like real-life Minecraft.
They completely changed the feel. Suddenly, the space looked “finished,” like a small outdoor room instead of a fire escape.
Practical notes from my trial run:
- Measure twice before you buy. I miscalculated and had to make a “deck tile Tetris” pattern until the second shipment arrived.
- Make sure your balcony surface drains properly; water needs to escape under the tiles.
- If you’re renting, look for non-permanently fixed tiles you can just lift up when you move.
The University of Minnesota Extension actually recommends raised surfaces and proper drainage for outdoor flooring so moisture doesn’t get trapped and cause damage or mold under the surface. That’s not just about looks—it’s structural health for your building too.
3. Bare Concrete (I Tried To Embrace Industrial Chic… I Failed)
I briefly tried “accepting” the concrete and working with it—added a small mat, some plants, tried to call it “minimalist industrial.” It just… felt unfinished. If you love that look, go for it. But in my experience, changing the flooring gave the biggest room-like transformation for the least effort.
My final setup: interlocking deck tiles + a small outdoor rug layered near the chair. It felt cozy, but still dried quickly after rain.
Seating: The Thing You Should Probably Splurge On (A Little)
When I thought “balcony chair,” my brain went straight to those foldable camping chairs. I almost bought one. Then I remembered: if this is my second living room, I need living-room-level comfort.
I tested three types of seating over a couple of weeks, actually sitting outside for at least 30 minutes with each one:
Folding Chair: The “Fine, I Guess” Option
Pros:
- Cheap
- Easy to store
- Light enough to drag around
Cons:
- Didn’t invite lingering
- Not a place I wanted to bring a laptop or a book for long stretches
I used it twice and then went back inside to sit on my couch—kind of the opposite of the goal.
Bistro Set: Cute, But Not My Real Life
Then I tried a small metal bistro set with two chairs and a round table. It looked like a café in Paris… that I never went to. It was perfect for a 10-minute coffee but not for lounging.
If your main goal is quick meals or conversations with a friend, a bistro set is great. For me, I realized I wanted “curl up with a blanket and read for 90 minutes” level comfort.
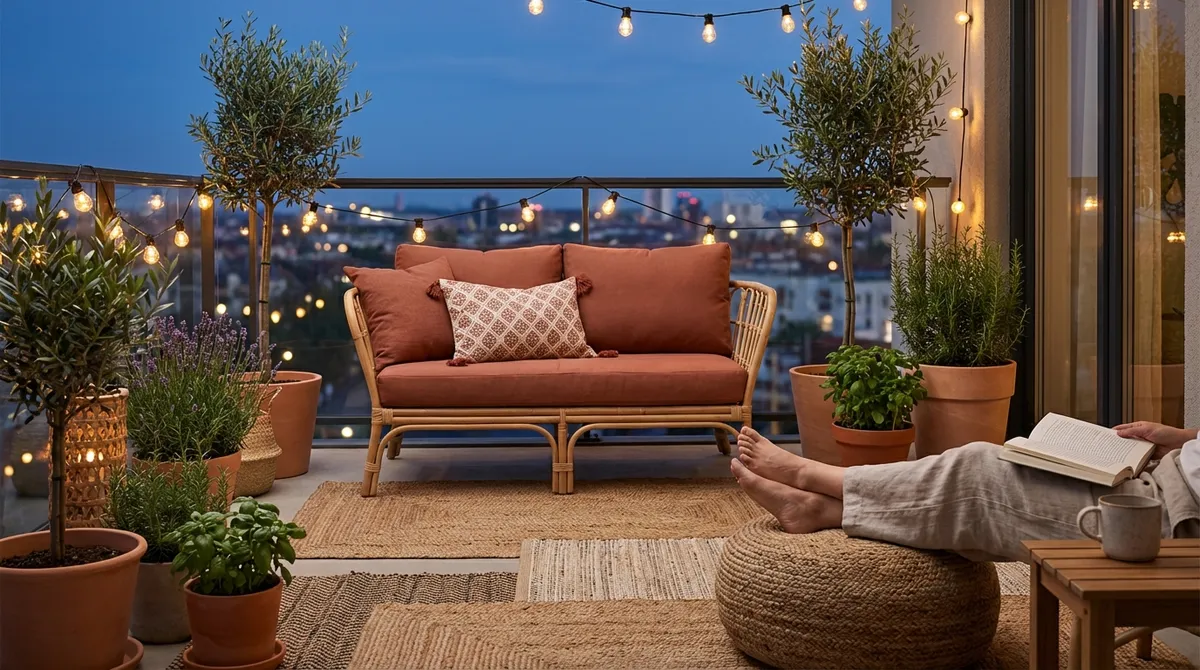
Deep Lounge Chair: The Winner
I eventually found a deep, cushioned outdoor lounge chair with armrests, rated for outdoor use with water-resistant fabric. It looked ridiculously big for the space on paper. In real life, it made the balcony feel intentional—like the whole thing revolved around this one perfect chair.
I learned a key lesson from interior designers I stalked online: if your space is small, one generously sized, super-comfy seat often works better than multiple tiny uncomfortable ones. The goal isn’t seating capacity; it’s making at least one person actually love being there.
Pro tip I got from an article on the American Society of Interior Designers: outdoor fabric matters. Look for solution-dyed acrylic or other UV-resistant textiles so your cushions don’t fade to a sad, uneven gray in one season.
Lighting: How I Made My Balcony Look Expensive (On a Budget and a Timer)
Lighting turned my balcony from “nice” to “okay this is a whole mood.”
I experimented with three layers:
1. String Lights (Obviously… But There’s a Catch)
I did the classic warm white string lights around the railing. Immediately cozier. But when I first put them up, I committed the rookie mistake: super bright, cool-toned LEDs that felt like a parking lot.
When I swapped to warm (2700–3000K) lights on a dimmer plug, it suddenly looked like a rooftop bar. LEDs are energy-efficient and last a long time, but the color temperature really changes the feel.
2. A Small, Rechargeable Lantern
I added a rechargeable, portable LED lantern that I could move wherever I needed: next to the chair for reading, on the floor for softer ambience, on the table when I had snacks.
This ended up being my most-used light source. No outlets needed, no cords to trip on, and I could bring it inside as a backup during power outages.
3. Candles… Until the Wind Bullied Them
I romantically lit some actual candles the first week. The wind blew most of them out in 90 seconds. Now I use a mix: one real candle in a deep hurricane lantern for the scent, plus flameless candles for the look.
If you’re in an apartment, always double-check your building rules about open flames, and never leave them unattended. My building sent one warning email after someone almost lit their privacy screen on fire.
For safety, I plugged all the string lights into an outdoor-rated smart plug and set them on a timer. I love that they just quietly turn on at sunset without me doing anything. It also keeps energy use under control, which the U.S. Department of Energy consistently recommends—outdoor lighting timers and smart controls are a simple way to cut electricity waste.
Plants: I Stopped Killing Everything Once I Did This One Boring Step
I used to impulse-buy plants based entirely on vibes. Big mistake.
This time, I did the thing I always avoided: I checked my balcony’s light conditions like a plant nerd. For a few days, I literally timed how long direct sun hit the space and at what angle.
Mine gets bright indirect light most of the day, with about 2 hours of softer direct light in the late afternoon. That meant no full-sun divas like lavender or most herbs, but great for:
- Snake plant (Sansevieria) in a shady corner
- Pothos climbing up a simple trellis
- A compact arborvitae in a tall pot for a “green wall” effect
- One large, hardy fern that honestly thrives on benign neglect
I also learned from university extension guides that drainage is non-negotiable. Every pot needs a drainage hole, and you want a saucer that doesn’t hold standing water too long. Otherwise, you’re basically opening a mosquito spa.
When I tested self-watering planters, something magical happened: my plants stopped yo-yoing between “drought” and “swamp.” The built-in reservoirs smoothed out my inconsistent watering habits.
A few real-world tips from my test runs:
- If your balcony gets windy (mine does), go for heavier pots or add some rocks at the bottom for ballast. Lightweight plastic pots flew over in one storm like they were auditioning for a slapstick movie.
- Group plants in clusters instead of spacing them evenly around the edges. It visually reads as “lush” and gives you a little microclimate of humidity that some plants like.
- If you’re high up or subject to building codes, check weight limits. Wet soil is heavy. Some condo associations actually specify maximum planter weight per linear foot of railing.
I still kill the occasional plant, but my success rate went from “80% plant graveyard” to “only the really dramatic ones didn’t make it.”
Storage, Clutter, and the “Nothing Ugly Stays Visible” Rule
Before the makeover, my balcony was where broken things went to think about what they’d done: bent drying rack, random boxes, a bag of potting soil slowly disintegrating in the rain.
I used one rule to change that: nothing ugly lives in plain sight.
Here’s how I pulled that off without losing functionality:
- I bought a narrow outdoor storage bench that doubles as extra seating and a table. All the ugly-but-useful stuff (watering can, fertilizer, bug spray, extra cushions) lives inside.
- I stopped using the balcony as a “temporary” storage area for cardboard or moving boxes. Temporary always turned into “six months.”
- I invested in one nice-looking watering can and left it out. If I had to dig it out every time, I just… didn’t water.
When I tested this decluttered setup, I noticed something weird: I went outside more often. It wasn’t just about looks—my brain stopped seeing the balcony as a chore pile.
On the flip side, totally emptying it didn’t work either. An over-minimal balcony felt sterile and echo-y. One or two decorative items (a small sculpture, a lantern, or a plant stand) made it feel like a legit room.
Real Talk: What Didn’t Work, and What I’d Do Differently
Not everything I tried was a win. A few honest fails:
- Outdoor curtains – They looked gorgeous for one windless afternoon. Then they turned into wet, tangled flags and needed constant tying, washing, and rearranging. If you live in a breezy area, consider roll-down shades or bamboo blinds instead.
- Too many small decor items – I went through a phase where I added lots of tiny lanterns, little statues, and knickknacks. Dusty clutter happened fast. Bigger, fewer pieces are easier to maintain and still create impact.
- Over-optimistic plant choices – I tried herbs that require full sun and regular harvesting. They sulked, got leggy, then died. Now I stick to plants that match the light I actually have, not the lifestyle I wish I had.
- White cushions – Stunning for photos. Nightmare for pollen, city dust, and coffee spills. I switched to medium-toned, patterned covers that hide stains better and are easy to toss in the wash.
If I were starting from scratch again, I’d do three things sooner:
- Measure everything and mock up the layout with painter’s tape on the floor. It feels silly but prevents buying furniture that’s 2 inches too wide.
- Ask my building management about weight limits, hanging items, drilling into walls, and gas/electric heaters before buying anything. Some items aren’t allowed on certain balconies, especially in high-rises.
- Start with just flooring + one chair + one plant, then live with it for a week before adding more. The temptation to buy everything at once is real, but it’s way easier to build up than to undo clutter.
Why This Little Space Matters Way More Than It Looks
After a few weeks of using my “second living room,” something unexpected happened: my screen time dropped a bit, my sleep improved, and my stress felt lower.
It’s not just vibes—there’s research backing this up. Studies from environmental psychologists and public health researchers have found that regular contact with green spaces—even small ones like balconies with plants—can support better mental health, reduced stress, and improved attention. A 2019 review in Science Advances linked exposure to nature with improvements in mood and cognitive function, even when that “nature” is modest: potted plants, views of trees, a small garden.
I’m not claiming my balcony cured anything. But having a dedicated, comfy micro-oasis where I can step outside, feel fresh air, and see something living that isn’t a notification badge has genuinely changed how my home feels.
It went from “I sleep here” to “I actually live here.”
So if you’ve got even a sliver of outdoor space—a tiny balcony, a weird side porch, a small patio—you’re sitting on untapped potential. Treat it like a real room. Start with one comfy seat, one flooring upgrade, one plant, and one good light source.
Give it two weeks.
If your experience is anything like mine, you’ll start scheduling your day around when you can sneak out there—and that’s when you’ll know your “second living room” is officially open for business.
Sources
- University of Minnesota Extension – Container Gardening – Practical guidance on containers, drainage, and plant selection for small spaces
- U.S. Department of Energy – Energy Saver: Outdoor Lighting – Recommendations on safe, efficient outdoor lighting, timers, and smart controls
- American Society of Interior Designers – Outdoor Living Trends – Insights from design professionals on fabrics, furniture choices, and outdoor comfort
- Harvard T.H. Chan School of Public Health – Nature and Mental Health – Overview of research on how access to green spaces can support wellbeing
- Science Advances – “Residential green space and mental health” (2019) – Research article exploring the links between everyday green space exposure and mental health outcomes