Simple Guide to Removing Limescale Buildup in Kettles Using Fast and Safe Meth
First, a quick reality check: if you clicked this expecting anything related to illegal substances, you can exhale. The only “meth” we’re talking about here is a fast and safe method for getting rid of stubborn limescale in your kettle.
I write a lot about home care and cleaning, and I’ve ruined at least two kettles by ignoring limescale for too long. I recently discovered a simple routine that actually works, doesn’t choke you with fumes, and doesn’t involve mystery chemicals that sound like they belong in a high‑school crime drama.
This is the exact method I now use at home, step by step, with what’s worked, what hasn’t, and what the research says.
Why Limescale Builds Up in Your Kettle (And Why You Should Care)
When I first moved to a hard‑water area in the UK, I thought something was wrong with my new kettle. The inside started looking like it had a chalky rash.
That chalky stuff is limescale – mainly calcium carbonate (CaCO₃) and sometimes magnesium compounds that precipitate out when you heat hard water. According to the UK Drinking Water Inspectorate and various water boards, over 60% of households in the UK are in hard or very hard water areas, and the US Geological Survey says large parts of the US Midwest and Southwest also have hard water.
In my experience, limescale does three annoying things:
- Makes water taste off – slightly metallic or chalky.
- Slows down boiling – that crust acts like an insulating blanket.
- Shortens kettle life – heating elements can overwork and fail earlier.
A 2017 study from the German Appliance Association noted that scale can increase energy use in kettles and boilers by up to 10–15% because the element has to fight through the buildup. That’s not nothing.
So yeah, it isn’t just cosmetic – it hits your taste buds, your power bill, and your appliance lifespan.
The Fast and Safe “Meth” I Actually Use
Let’s spell out what this method is:
- Fast – Takes roughly 20–40 minutes total.
- Safe – Uses food-safe acids (white vinegar or citric acid), no industrial descalers.
- Low‑effort – Minimal scrubbing, mostly soaking.
When I tested different options, I rotated between:
- White distilled vinegar (5–8% acetic acid)
- Citric acid powder (food grade)
Both are recognized by organizations like the Environmental Working Group (EWG) as relatively safe and low‑toxicity household ingredients when used correctly.
For electric kettles with concealed elements, I lean almost entirely on soaking so I don’t scratch the interior. For old-school metal stovetop kettles, I’m a tiny bit more aggressive.
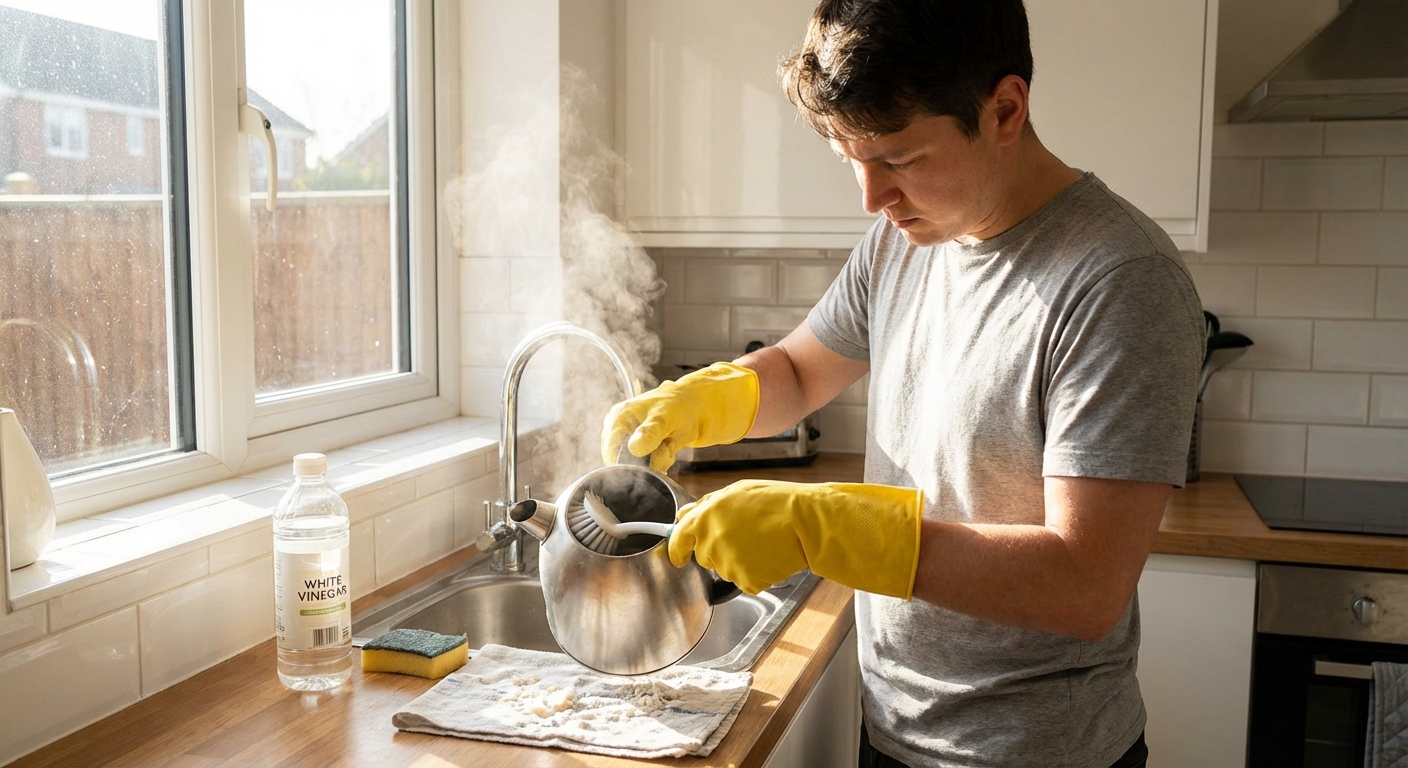
Step‑by‑Step: Vinegar Method (My Go‑To for Heavy Buildup)
I started using this on a kettle that honestly looked like the inside of a seashell. Here’s how I do it now when things get out of hand.
1. Empty and Inspect
Pour out any water and look inside under good light. If you see:
- Thick, flaky layers of white/cream scale
- Brownish staining around the element
…you’re in heavy‑buildup territory. Vinegar tends to win here.
2. Mix the Solution
I use a 1:1 mix of white vinegar and water:
- Fill the kettle to cover the limescale line (don’t exceed the max fill mark).
- Half water, half vinegar.
If it’s extremely bad, I sometimes go a little stronger, up to 60% vinegar, but that’s more for ancient, neglected kettles.
3. Heat – But Don’t Fully Boil
I’ve tested both boiling and just heating:
- I bring it just up to the boil (you see bubbles forming, hear it getting loud), then I turn it off.
- For kettles that shut off automatically, let it click off once.
Boiling too aggressively can kick up vinegar fumes, which isn’t dangerous in small amounts but it stinks and can irritate your nose and eyes.
4. Soak for 20–30 Minutes
Let the hot vinegar solution sit.
When I tested this the first time, I peeked at 10 minutes and could see flakes of limescale floating off. The acetic acid reacts with calcium carbonate, forming water‑soluble salts and carbon dioxide (that’s the gentle fizzing you might see).
If the scale is very thick, I go the full 30 minutes.
5. Gently Scrub (If Needed)
After soaking:
- Empty the kettle.
- Use a non‑scratch sponge or a soft bottle brush.
- For really stubborn patches, a wooden or plastic spatula works better than metal – it’s firm but doesn’t gouge.
Avoid steel wool or anything very abrasive. Manufacturers like Breville and Philips explicitly warn that harsh abrasives can damage the stainless surface or non‑stick coatings.
6. Rinse Thoroughly (This Part Matters More Than You Think)
Rinse at least 3–4 times with clean water.
When I rushed this step once, my next cup of tea tasted like a salad dressing experiment gone wrong. So now I:
- Fill halfway with fresh water, swish, pour out.
- Repeat several times, wiping with a clean cloth in between if needed.
7. Boil Fresh Water Once and Discard
This is my “safety boil” to remove any lingering vinegar notes.
- Fill with fresh water
- Boil
- Discard
After that, the kettle’s good to go.
Step‑by‑Step: Citric Acid Method (My Favorite for Smell‑Sensitive Noses)
If you hate the smell of vinegar in your kitchen, citric acid is a hero. I switched to this when I was descaling at night and didn’t want the whole flat smelling like a chip shop.
1. Mix a Citric Acid Solution
Typical ratio I use:
- 1–2 tablespoons citric acid per 1 liter of water
Stir until fully dissolved, then pour into the kettle up to the usual limescale line.
2. Heat and Soak
- Bring to just below a boil or let the kettle auto‑switch off.
- Leave it to soak for 15–25 minutes.
In my experience, citric acid works just as well as vinegar for light to moderate scale, and almost as well for heavy scale (you may just need a second round).
3. Rinse and Safety Boil
Same as with vinegar:
- Rinse a few times
- Boil fresh water once and discard
The taste is much milder, almost unnoticeable after a rinse.
Pros and Cons of These DIY “Meths”
I’ve tried commercial descalers, fizzy tablets, and some sketchy tips from random forums. Here’s how these food‑grade methods stack up honestly.
Pros
- Safe and food‑friendly: Vinegar and citric acid are widely used in cooking and food preservation.
- Cheap: A big bottle of vinegar or a bag of citric acid lasts ages.
- Effective: They dissolve limescale instead of just loosening it.
- Gentler on appliances: No harsh industrial chemicals, assuming you don’t scrub like you’re polishing a car.
Cons
- Smell (vinegar): It can be pungent, especially in a small kitchen.
- Time: You need 20–40 minutes of soak time; it’s not instant.
- Very heavy scale may need repeats: For kettles neglected for years, you might have to do two rounds.
- Not a fix for everything: If the heating element is already damaged, descaling won’t magically resurrect it.
Some manufacturers, like De’Longhi and Smeg, recommend brand‑specific descaler products, and using those can be necessary to keep a warranty intact. So if your kettle is still under warranty, it’s worth checking the manual.
How Often I Descale (And How You Can Tell It’s Time)
When I first tracked this, I realized I was only descaling when tea started tasting weird. By then, the buildup was already thick.
Now, I use this rough schedule based on water hardness and kettle use:
- Hard water, daily use (4–6 boils/day): Every 2–3 weeks.
- Moderate water, daily use: Every 4–6 weeks.
- Soft water or rare use: Every 2–3 months.
Simple visual cues I look for:
- A visible white ring at the water line
- “Floaty bits” in the freshly boiled water
- Kettle seems louder and slower to boil than when it was new
If you’re unsure about your local water hardness, many water suppliers list it on their websites, or you can buy cheap test strips online.
How to Prevent Limescale Buildup (So You’re Not Descaling Constantly)
I love a deep clean as much as anyone who writes about this stuff for a living, but prevention genuinely saves time.
Here’s what’s actually helped in my own kitchen:
- Don’t leave standing water in the kettle for days. Empty it once you’re done for the day.
- Use filtered water if your area is extremely hard. It won’t remove everything, but it reduces mineral load.
- Quick mini‑descale: Once a month, I run a weaker solution (like a splash of vinegar in water), quick heat, short soak, rinse. It stops the thick crust from ever forming.
Some people swear by dropping a stainless steel “descaler ball” or a small clean pebble in the kettle to attract scale. I tested this with a stainless steel coil ball – it did collect some scale, but it didn’t replace descaling. Think of it as a helper, not a cure‑all.
When You Shouldn’t Use This Method
There are a few situations where I’d pause before grabbing the vinegar:
- Kettles with special coatings – If your manual says “no acids” or only approved descalers, follow that. Acids can damage some interiors.
- Kettles with decorative patterns or enamel – Strong vinegar solutions might dull certain finishes over time.
- Severely corroded or rusting kettles – Limescale removal might expose just how bad the metal underneath is. At that point, replacement is usually safer.
When I inherited an ancient enamel stovetop kettle from a relative, I tested a mild citric acid solution on a tiny area first. The enamel was fine, but it’s always worth doing a patch test if you’re unsure.
Final Thoughts from My Own Kitchen Sink
I’ve gone from secretly judging the chalky line in other people’s kettles to realizing mine was worse. Once I started using this fast and safe descaling method regularly, three things changed:
- My tea and coffee tasted cleaner.
- The kettle boiled noticeably faster (especially after the first heavy descale).
- I stopped eyeing new kettles online every few months.
If your kettle’s starting to look like a geology exhibit, try the vinegar or citric acid method once. Take a quick before‑and‑after photo – the difference is oddly satisfying and honestly a little addictive.
And if someone asks about your “meth” for cleaning kettles, you can casually tell them you’ve got the fast and safe version nailed.